How to Import
You can import models into KeyShot Studio in several ways:
- by pressing Import on the Toolbar
- by drag and drop into the Real-time View
- via the hotkey combination Ctrl+I/Cmd+I
- via the Main Menu > File > Import…
- via the Main Menu > File > Import Dialog…
Quick import
The first time you import using any of the supported formats, the Import Dialog will appear. In the bottom left corner of the Import dialog you have the option Enable Quick Import. This will allow you to skip the Import Dialog on import, using on of the first 4 methods – Main Menu > File > Import Dialog… will still show the Dialog.
You can edit the Import Settings in Preferences where you also can opt out of the Quick Import again.
Import Dialog
You can import a number of different 3D file formats into KeyShot Studio. Depending on the file type you are importing, some of the options below might not be displayed in your Import Dialog.
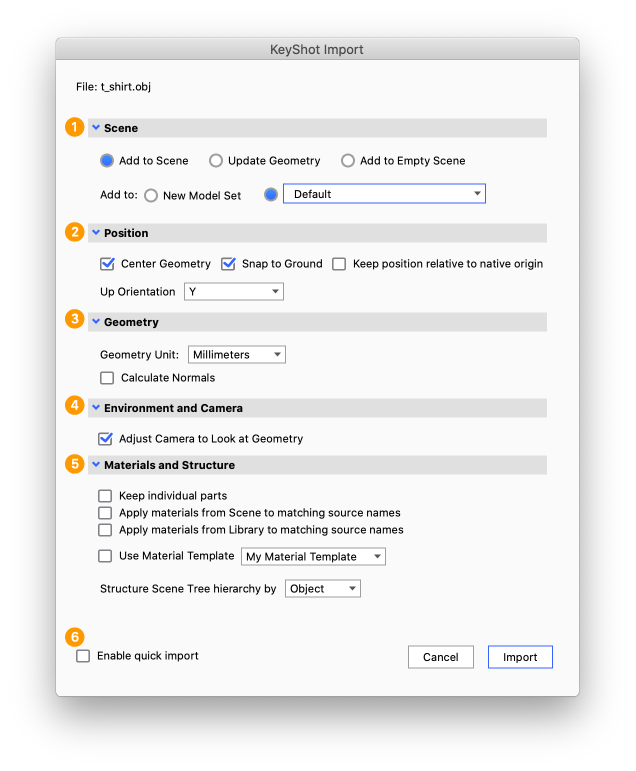
1. Scene (Pro only)
If you already have content in your scene, the Import dialog will offer following options:
- Add to Scene – This will import the model into the current scene. When this is selected, you can also control which Model Set You want to add the Model to:
- New model Set – This will create a new Model Set and import the file to that
- Select Model Set(s) – Select which Model Set(s) you want to place your model in. The currently active Model Sets will be selected by default.
- Update Geometry – If you have imported the model once already, this option will be available. This will enable you to update changes to a model without having to start over on the KeyShot Studio scene. If you choose to update, some of the options in the dialog will be hidden and KeyShot Studio will compare the geometry with what is in the scene already, and remove/add the differences. Note that if you have altered the geometry (eg. via Tools) or renamed parts inside KeyShot Studio this will have an impact on the ability to update the geometry.
- Add to Empty Scene – This will clear the current scene and add the imported model in a fresh scene.
2. Position
- Center Geometry – When checked, “Center Geometry” will import the model and place it in the very center of the environment. Any original 3D coordinates for the model are removed when center geometry is selected. If this option is not selected, the model will be placed in the same position in 3D space where it was originally created.
- Snap to Ground – When checked, “Snap to Ground” will import the model and position it directly on the ground plane. This will also remove any original 3d coordinate information.
- Keep position relative to native origin – When Checked this will place the geometry in relation to the original origin point. Use this for multi-import assemblies with a shared CAD origin.
- Up Orientation – Not all modeling applications define the up-axis in the same manner. Depending on your application, you may need to set a different orientation other than the default “Y Up” setting. Although KeyShot Studio will recognize the up orientation of the 3D modeling software, your model may have been built in a different orientation. If your model comes in on its side, try setting a different orientation.
3. Geometry
- Geometry Unit – Use this drop-down menu to choose the correct units the geometry was modeled in for the first import. The model scale will be adjusted accordingly upon second import if a different unit is selected. Available only for .wire, .3ds, .obj and .stl file formats.
- Tessellation Quality – Use this slider or input box to input the tessellation quality of the geometry. Lower values will import faster and higher values will import slower. It is recommended to use the default value of 0.2.
- Accurate Tessellation – This option will optimize tessellation triangle size for improved performance. It is suggested to enable this option if available for your import format.
- Import NURBS Data (Pro) – This option will bring in NURBS geometry that ensures no faceting on the model for completely smooth curves.
- Cached Geometry – This option allows importing of an assembly without the contained part files. Available for SolidWorks and SolidEdge only.
- Calculate Normals – Available for .obj only. It is recommended to try importing first with this option disabled as normals may already be included in the file.
4. Environment and Camera
- Adjust Camera to Look at Geometry – When checked, the camera will center to fit the imported geometry in the scene upon import.
- Adjust Environment to Fit Geometry – When checked, the environment will size to fit the imported geometry in the scene upon import.
- Import Cameras – This will add native CAD cameras to the KeyShot Studio camera list. Only available for .fbx, .ma, .mb, .bip, .ksp.
5. Materials and Structure
- Separate Materials by Part/Layer – This option will isolate linked materials to each part by prefixing a part name to each material name.
- Keep Individual Parts – This option avoids merging of objects for troubleshooting purposes. It is recommended to try importing with this option disabled first to avoid excess separation of surfaces. Only available for .wire, .dwg, .dxf, .igs, .obj and .skp.
- Retain Materials – This option appears for Update and Add to Scene imports to ensure that materials that have already been assigned in the scene will be applied to the new import if the native CAD materials names match.
- Import Layers as Groups – Uses Layers setup in Maya to define tree structure. Available for .ma and .mb only.
- Collapse Hierarchy – Flattens tree structure to simplify Scene Tree. Available for .ma and .mb only.
- Assign Materials from Library – When this is enabled materials will be auto-assigned upon import if the native CAD materials have the same name as materials in the KeyShot Studio Library.
- Use Material Template – If you have Material Templates set up in KeyShot Studio you will have the option of using one to with the import. Material Templates can bulk assign materials from the KeyShot Studio library to the imported parts based on the name of each part’s original material. See the Material Templates page to learn more.
- Structure Scene Tree hierarchy by – Use this drop-down to set up the Scene Tree structure. Different options will show depending on file format.
- Object (name) – retains assembly structure and naming for accuracy and flexibility
- Material (type) – flattens the hierarchy for a simpler tree structure by creating a single part for each material
- Layer – retains assembly structure and naming for accuracy and flexibility
- Shader – flattens the hierarchy for a simpler tree structure by creating a single part for each shader.
6. Enable Quick Import
When you enable this the settings in the current Import dialog will be remembered and applied next time you are importing model in the same file format. You can disable or edit the settings for Quick Import in the Import settings in Preferences.
Additional Options
- Animation – Entire Animation imports all the animation data available in the file. Specific Frame imports i.e. deformations at a specified frame and does not import animations to the Timeline. Available for .abc, .ma, .fbx and .mb only.
- Curve Import Options – Curve Radius Modified adjusts imported curve thickness. Available for .abc, .fbx, .ma and .mb only.
Known Limitation
Import of NURBS animations from Alembic files is not supported.
BIP import
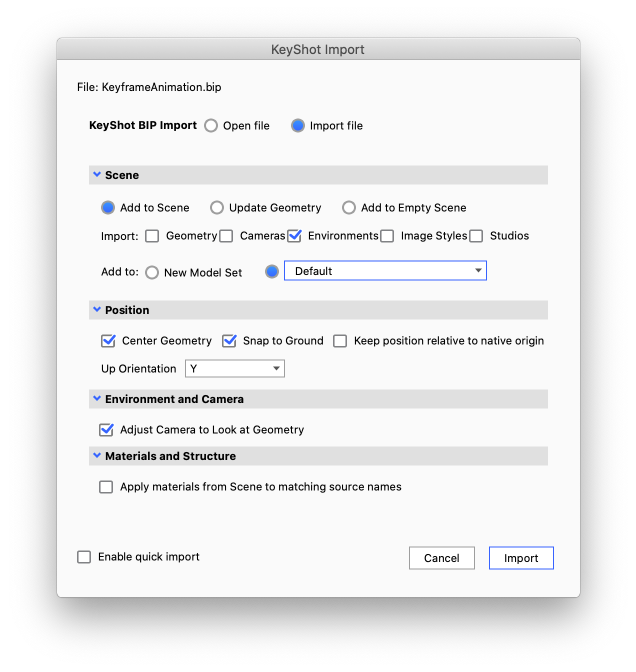
You can also select a KeyShot Studio scene (BIP) for import. If you do that KeyShot Studio will ask if you want to open the file or import it into the current scene.
- Open file – will hide the rest of the options in the dialog, close your current scene and open the new scene.
- Import file – When checked, the import dialog will show the various Import settings for how to add the model to the current scene.
Note
The difference between Open File and Add to new scene is that with Open File everything will be as it was last time you saved the scene, while Add to new scene will import the model into your Startup Scene, with everything that entails (geometry, environments, cameras etc.).
In addition to some of the options described in the Import Dialog section above, you will see following choices:
Scene
- Import – Select what to include from the .bip or .ksp.
Materials and Structure
- Apply Materials from Scene to matching source names – Update and link materials in the imported model, if they share a name with a material in the In-project Library.
- Apply Materials from Library to matching source names – Update and link materials in the imported model, if they share a name with a material in the Material Library.
Note that if both options are enabled, and different versions of a material exist in the library and the current scene, the material from the scene will be applied to imported geometry.
Note
If you experience problems with opening scenes with e.g. heavy displacement, you can try to open it in recovery mode. This means that the scene will be opened in Performance mode and that no Geometry nodes are executed. You can find the option in the Main menu > Help > Open (Recovery mode)…