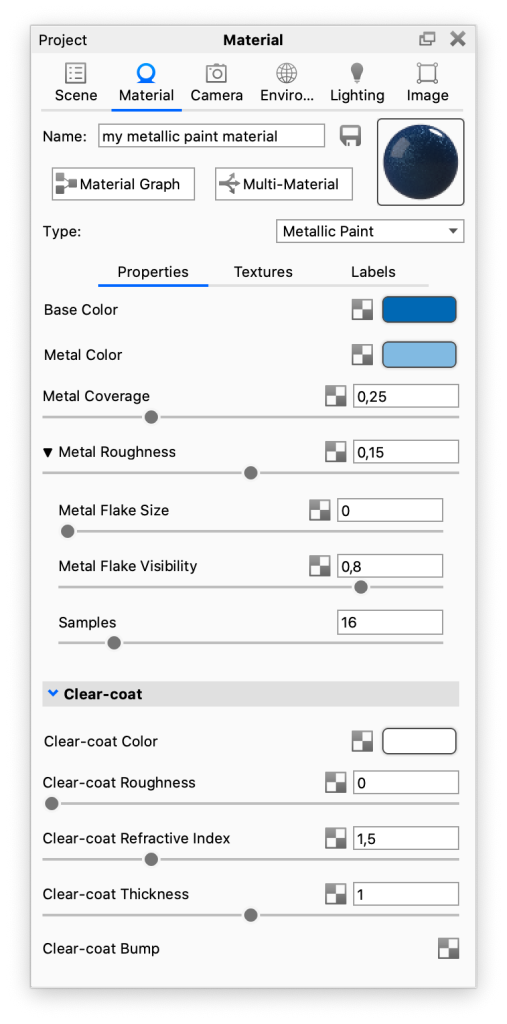
The Metallic Paint material type simulates a two-layer paint job: a base coat and a clear-coat that provides a clean reflection over the entire material.
Paint Settings
Base Color
This is the overall color of the material for the base coat of paint.
Metal Color
This can be thought of as a coat of metal “flakes” sprayed over the base coat. You can choose a color that is similar to base color to get a subtle metal flake effect, or you can choose a contrasting color to get some interesting results. A white or gray metal color is also commonly used for realistic paints. The metal color in the material will show more in the directly lit or brightly highlighted areas of the surface while the base color will show more in the less illuminated areas.
Metal Coverage
This controls the ratio of base color to metal color. When it is set to 0, you will see only the base color. When it is set to 1, the surface will be almost entirely covered in the metal color. For most metallic paint materials, you will want this value set close to 0. A setting of 0.25 is the default and a good starting point.
Metal Roughness
This controls the spread of the metal color over the surface. When it is set to a low value, you will see the metal color only in small areas around the highlight areas. When it is set higher, the metal will spread more evenly across the entire surface. A setting of 0.15 is the default and a good starting point.
Metal Flake Size
Controls the size of the metal flakes – extremely large values recreate a “bass boat” paint.
Metal Flake Visibility
Controls the opacity of the metal flakes, on a scale form 0 – 1.
Samples
This will control how imperfect or refined the metal effect in the paint will look. A low setting will result in a more noticeable “flake” effect. A higher setting will smooth out the distribution of the metal effect, and it will have less noise/grain. When seeking a pearl effect, use a higher setting.

Clear-coat Settings
The clear-coat settings control the top clear-coat layer. Settings are unit-aware and can have a bump map applied that does not affect the base coat.
Clear-coat Color
Sets the color for the clear-coat layer. The lighter the color, the lighter the clear-coat. The default is white (completely clear).
Clear-coat Roughness
The metallic paint clear-coat layer, by default, provides perfectly clean reflections. However, if a satin or matte paint effect is desired, the clear-coat roughness value may be increased. This will spread out the reflections on the surface for a matte look.
Clear-coat Refractive Index
This slider controls the intensity of the clear-coat. 1.5 is the default and a good starting point. If a more shiny paint is desired, increase the value. Bringing the value down, closer to 1, reduces the clear-coat effect. This can be useful for making a matte finish or simulating plastics that have a metallic flake effect.
Clear-coat Thickness
Sets the thickness of the clear-coat. This is set as a thickness multiplier that can be textured. A higher value will darken the clear-coat. This setting can be textured by clicking on the texture icon next to the setting. This will override the value and provide additional settings for the texture type selected.
Clear-coat Bump
Right-click on the ![]() texture icon to add a texture to the Clear-coat Bump. This will only affect the Clear-coat layer while adding a Bump through the Textures tab will affect both the base and the clear-coat.
texture icon to add a texture to the Clear-coat Bump. This will only affect the Clear-coat layer while adding a Bump through the Textures tab will affect both the base and the clear-coat.