Motion easing will create a more natural look when applied to rotations, translations and camera animations. This will add acceleration and deceleration to motion.
For example, if a car goes from one stop sign to another and reaches a maximum speed of 50 km/h (approx.30 mph), it is not traveling that speed for the entire time. The car has to start moving, accelerate to its top speed and then slow down as it approaches the next stop sign. Without motion easing, the car would start and stop abruptly and travel 50 km/h (approx.30 mph) the entire time it is in motion.
Presets
Linear

Ease In

Ease Out

Ease in/Ease Out

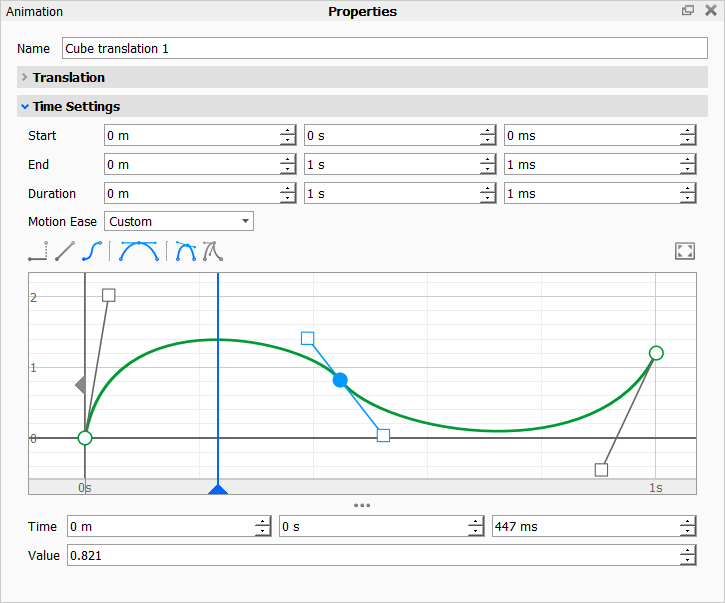
Custom Easing Curves
With custom easing you have full control of the easing curve. When you select the Custom easing curve the default will be a linear progression from start to end. Select one of the square handles and drag to change the easing.
Each keyframe determines the interval from the keyframe til the following keyframe. By default all keyframes will be curve points when you add them, but you can easily change the type:
Types of keyframes
![]() Stepped:
Stepped:
This will keep a fixed value until the next keyframe in the timeline is reached.
![]()
![]() The stepped keyframe will by default not have a tangent handle opposite the stepped section, but you can add it via the Tangent handle icon. This way you can ease into/out from a stepped value.
The stepped keyframe will by default not have a tangent handle opposite the stepped section, but you can add it via the Tangent handle icon. This way you can ease into/out from a stepped value.
![]() Use the value at the start of the interval.
Use the value at the start of the interval.
![]() Use the value at the end of the interval.
Use the value at the end of the interval.
![]() Curve:
Curve:
Curve keyframes have tangent handles that can be manipulated to make the transition ease in/out.
![]()
![]() Lets you enable/disable the left/right tangent handles
Lets you enable/disable the left/right tangent handles
![]() Keep tangent handles locked opposite to each other.
Keep tangent handles locked opposite to each other.
![]() Unlock tangent handles.
Unlock tangent handles.
![]() Straight:
Straight:
This is a variant of the curve point, where both tangent handles have been disabled by default. Simply click the tangent handle icons to make it a regular curve point.
Customizing the easing curve.
Adding a keyframe: Double click in the grid or right click and select Add Key to add a keyframe.
Setting the value: Select a keyframe on the curve and add the time and the value of it below the grid or simply drag it in the curve editor. Hold Shift to restrict to horizontal movement (adjusting time only).
Adjusting the curve: Drag the tangent handles to adjust the ease-in/out of a key. Hold Shift to restrict to horizontal movement.
Deleting a keyframe: Select a keyframe and press the Delete key or right click the keyframe and select Delete.
Time indicator and work area: The curve editor has the same Time and Work Area indicators as the regular Animation timeline, enabling you to scrub through the timeline and limit the animation from the curve editor.
Move the Grid: Click and drag inside the grid to move the timeline.
Zoom in the grid: Click in the grid and use the scroll wheel or Ctrl +/- (Win) Cmd +/- (Mac) to zoom in/out.
Zoom to fit: You can fit the current curve in the curve editor simply by clicking the ![]() Zoom to Fit button above the grid.
Zoom to Fit button above the grid.
Copy curves
You can copy custom curves from one animation to another. Simply right click anywhere in the curve editor, and select Copy Curve. Then right click the Curve editor of the “destination” animation and select Paste Curve. Note that this may impact the length of the second animation.