The ![]() Move tool can be triggered in different ways:
Move tool can be triggered in different ways:
- Right-click a selected part/model in the Scene Tree and choose
 Move.
Move. - Right-click a part in the Real-time View and choose Move Selection, Move Part or Move Model, depending on what you want to move.
- Click the Move button in the Tools section of the Ribbon or in the Scene tab of the Project Panel. If no part(s) are selected, this will trigger a dialog, where you can choose which part(s) you want to move.
- Use the hotkey ctrl+d on Windows and cmd+d on Mac. If no part(s) are selected, this will trigger a dialog, where you can choose which part(s) you want to move
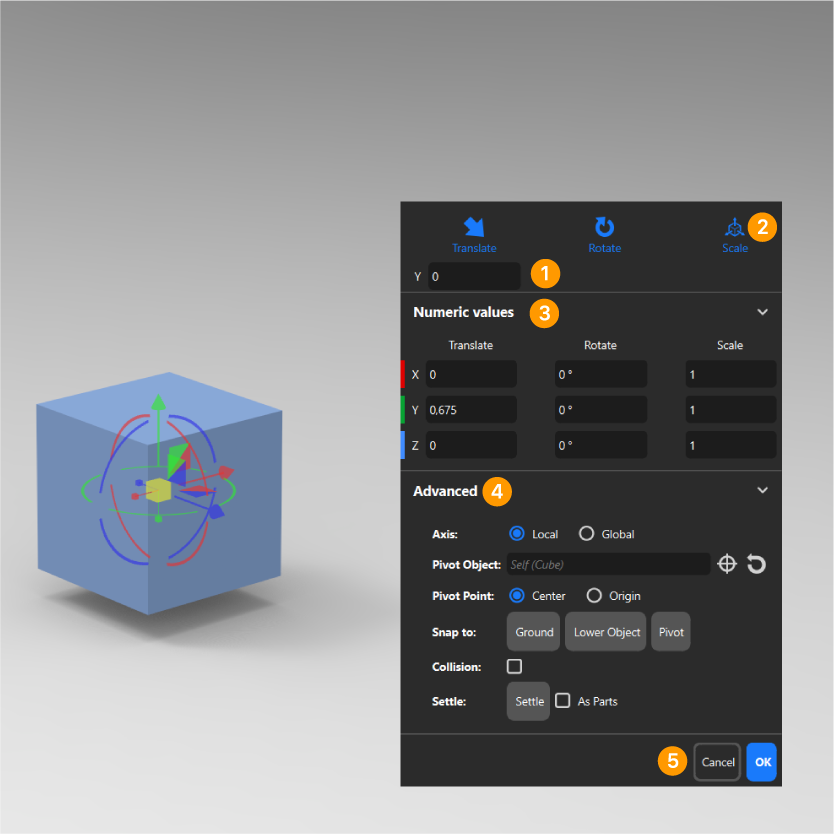
Once you have selected what to transform, the Move Tool will be visible in the Real-Time View. The Move Tool consists of different handles that control translation, rotation, and scale in the X, Y, and Z directions.
Working with the Move Tool
- Edit Move
When a move has been done, the top of the Move tool will show you how much you’ve translated/rotated/scaled the object. This value can then be edited. - Mode selection
Select which handles you want to see on the move tool. When rotating you can press Shift while dragging to make the rotation snap in 15° increments. - Numeric values
This section will show the exact position of the object you are currently moving. For a faster work flow, you can use the Hotkeys T, R and S to toggle between Translation, Rotation and Scale. Use the Hotkeys X, Y and Z to toggle between axes. Move your mouse or edit the boxes to quickly adjust the object position. - Advanced
- Axis
Choose an axis from which to reference your transformations.- Local uses the axis inherent in the part or model.
- Global uses the XYZ coordinates from the KeyShot Studio scene.
- Pivot Object
By default the Pivot is in the center of the current selection. To select another pivot point click the pick icon to launch the Pivot Selection dialog.
- Pick: When the Pivot Selection dialog is displayed you can select a part or a model/group to use as Pivot – either in the Pivot Selection dialog itself or by clicking on the part in the Real-Time View – followed by OK. This effectively sets the center of the selection as the pivot. The name in the pivot field is changed to the name of the part/group and the Move tool is moved to the pivot point.
- Reset: The
 reset button will return the pivot point to the original position in the center of the part(s) and the text in the pivot field now says Self again.
- Pivot Point
An object may have been modeled with a pivot point that is off-center. Here you can choose which pivot point should be used.- Center: The objects center will be used as the pivot point for moving.
- Origin: The pivot point defined in the modelling software of the object will be used as the pivot point for moving.
- Snap to
The snap to functionality allows you to quickly move the object into place.- Ground: The Snap to Ground quickly moves the model in the Y-direction (up-down) to snap the lowest point on the models bounding box to the ground plane. This is useful when the model has been moved and is no longer touching the ground plane.
- Lower Object: The Snap to Lower Object option will automatically move the bottom edge of the object’s bounding box to the top edge of the bounding box of the part located below.
- Pivot: The Snap to Pivot option will move the part(s) to the selected pivot. More precisely will the option align the center of the part(s) with the center of the pivot object.
- Collision
Toggles on collision detection. This makes it so that when moving objects in the scene, collision between objects will be detected, and avoiding intersecting objects is made easier. To temporarily disable collision detection, you can hold down ctrl on Windows and cmd on Mac while moving the object.
- Settle
The Settle function will drop the currently selected objects using physics.- As Parts: if a Group is selected, toggling this will make the settle consider the parts of the group as individual objects.
- Axis
- Cancel/OK
To finalize the movement, press OK. To cancel the movement that has been done, press Cancel.
Note
The Collision and Settle functions do not work with objects consisting of surfaces with no thickness.