Name Templates have been introduced in 9.1.
With Name Templates you now have precise control over what is generated as the Render name. This is based on what is active in your scene, with options ranging from the Scene Name, Active Camera, Current Date, and more. This way you can easily give your images descriptive names, like MyScene-Hero-Outdoor-01-28-2020.jpg. This makes it easier to navigate to specific images in the render folder, especially when rendering jobs contain multiple images e.g. from a configuration.
Name Template UI
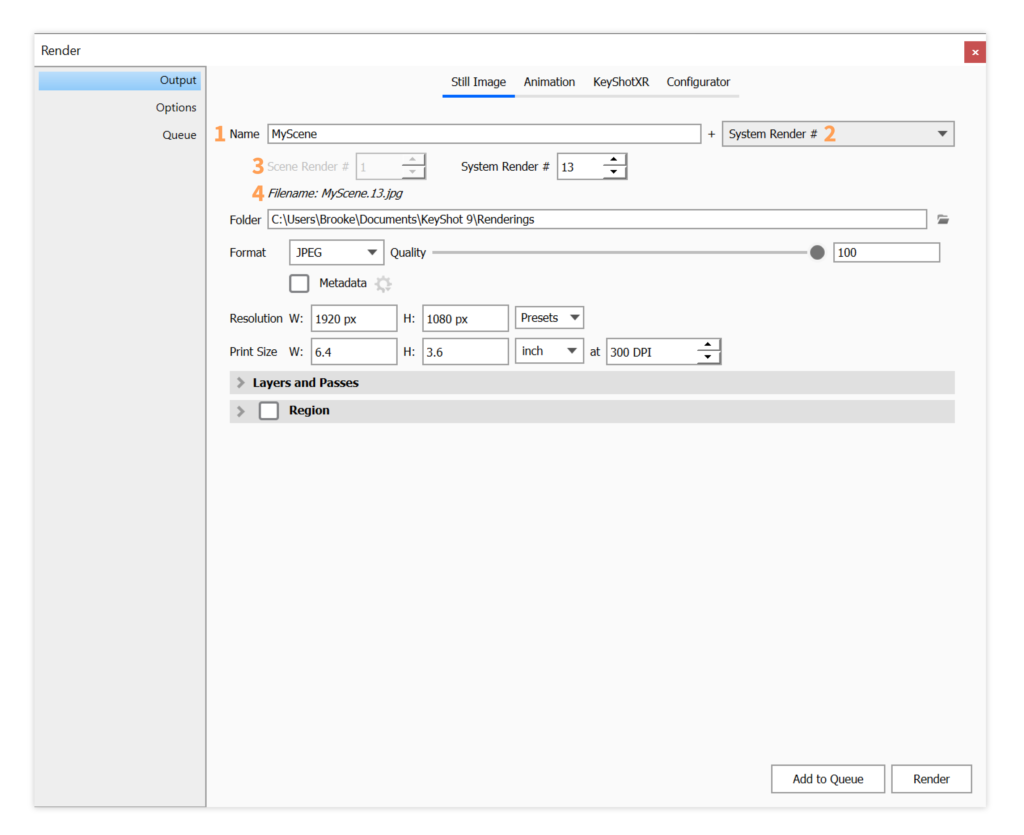
- Prefix: The Prefix enables you to add custom text before the automated variables of the Name Template. By default it is populated with the Scene name, but you can write whatever suits your purpose or even leave it blank. If the Prefix text is identical with the Scene name, this will automatically be updated if the scene name changes.
- Name Template: The Name Template enables you to select variables from the scene that you want to add to the Render name.
- Revision Numbers: If your Name Template contains one of the two Revision Numbers (see definition in the list of variables below) you can reset them here.
- Filename Preview: The filename preview shows the full Render name as it will be when the Prefix and the Name Template are combined.
Default Name Templates
KeyShot Studio comes with 2 predefined Name Templates, which cannot be deleted/altered.
- The default Name Template is called System Render #. In combination with the default Prefix, it offers the behavior you know from previous versions of KeyShot Studio, where the scene name is combined with an incremented number.
- If you want to be in total control of the Render name, without any automated behavior, you can select the None template. Then the Render name will only consist of the Prefix and the file extension. Note that this is not well suited for adding jobs via the Queue. When rendering an XR, Animation or Configurator, the image names will always be appended with a sequence number to avoid name conflicts.
Custom Name Templates
You also can setup your own Name Templates from a number of variables that extract information from the scene. These can be used either as Temporary Custom Templates, which can be used here and now or as Presets that you can reuse across scenes.
Setting up a Custom Name Template
- Select Custom… in the Name Template drop-down. This will launch a new window where you can customize your Name Template.
- Preset: In the Preset drop-down, you can select a template to start from. When you change the setup of that template, the name in the Preset drop-down will be replaced with Custom which indicates that the current setup is not saved as a preset. You don’t have to save the setup as a Preset in order to use it, but if you select not to save it, please note that the setup is temporary and will be lost when you select another Preset.
- Save Preset: Click the Save icon to save the setup as a Preset
- Delete Preset: If you don’t want to keep a specific preset, just select the preset in the list and click the Delete icon. Note that if you select to delete a preset that is used by other scenes, it will simply appear as an unsaved template when you open any of those scenes next.
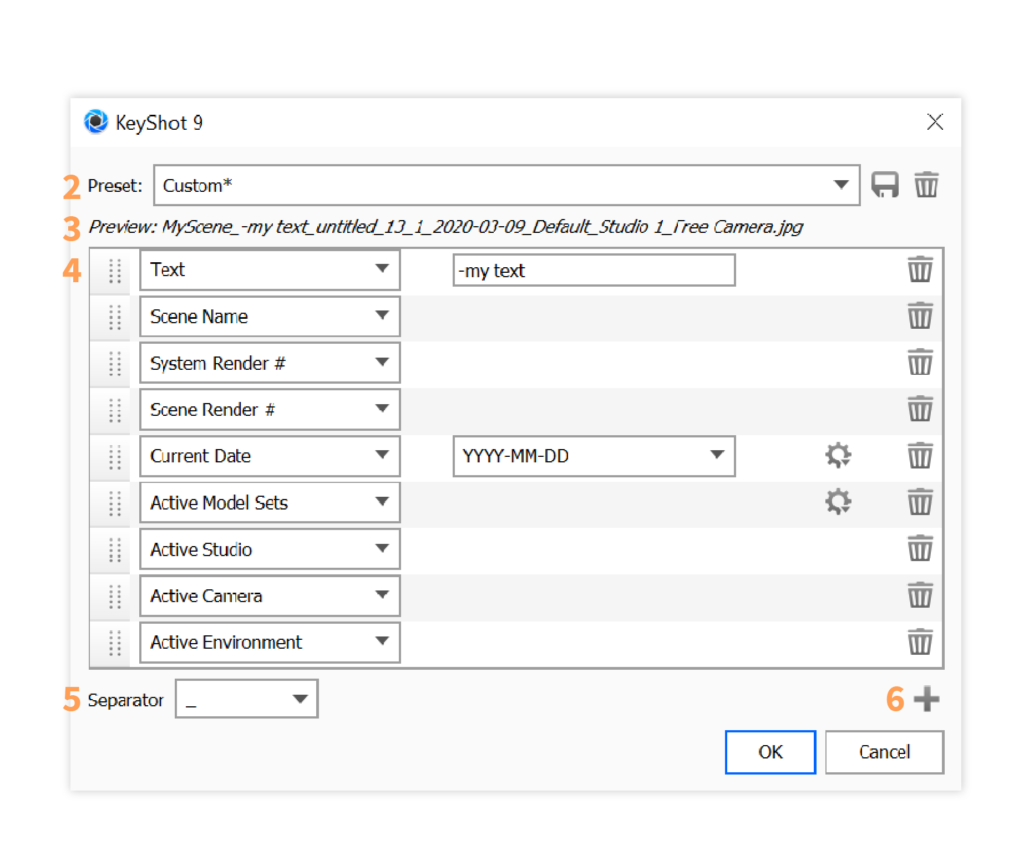
- Preview: The Preview shows the result of the current Prefix + Name Template setup, based on the current scene.
- Variables: You can select the type of variable in the first drop-down in each line. To change the order of variables, simply grab the drag-handle of a variable and drag and drop. Press the delete icon on a variable, if you want to remove it from the template.
- Text: Enables you to add custom Text anywhere in the template. The Text variable is the only one that can appear more than once in a template.
- Scene Name: If you don’t want the Scene Name in the Prefix, you can add it inside the name template.
- System Render #: Adds a number that is incremented each time you render or use the screenshot function. The number is shared between all scenes that are rendered/sent to Network Rendering via your KeyShot Studio installation. The number can be reset via the System Render number spinbox below the Prefix in the output tab.
- Scene Render #: Adds a number that is incremented each time you render the current scene. This number is saved with the scene, so you can continue the sequence where you left off, no matter what KeyShot 9.1+ computer you use – Just make sure to save the scene if you want to continue the sequence. The number can be reset via the Scene Render number spinbox below the Prefix in the output tab.
- Current Date: The Current Date variable will add a date stamp to the Render name. This means the date the render job was created/sent to the queue/Network Rendering, not the actual render date if the job is queued. You can select a date format and the Settings drop-down enables you to control the internal separator that appears between day, month and year in the date.
- Resolution: This will add the output resolution to the name.
- Active Model Sets: This adds all active Model Sets to the Render name. If there is more than one Model Set, these will be separated by an internal separator that can be selected via the Settings drop-down on the variable.
- Active Studio: This adds the active Studioto the Render name. Note that if you render a still image there may not be a studio selected, and in that case the variable will be skipped.
- Active Camera: This adds the active Camera to the Render name.
- Active Environment: This adds the active Environment to the Render name.
- Active Image Style: Adds the currently active image style to the render name.
- Separator: The Separator drop-down enables you to select the separator that goes between the individual variables. Note that some of the variables (Model Set and R) also have internal separators that can be controlled from the settings drop-down on the variable.
- +: Add variables to the template. Note that (except the Text variable) each variable can only be added to the scene once.