What does the tool do?
Use the Split Object Surfaces option if you would like to split specific polygons from a single part. This is useful if you would like to apply separate materials to a single part, or when parts are modeled together and you would like to work with them separately.
How to Split Object Surfaces
- Select a part and launch the
 Split Object Surfaces tool, via the Tools section in the Ribbon, or via the context menu in the Real-time View
 - Choose Splitting Method – By Splitting Angle or by Polygons
- Now you can choose to split out either a single surface via the Marquee, Brush andSurface Selection or all surfaces with the Part Selection.
- Marquee selection:
- Hold Shift+LMB and drag to use the marquee selection.
- Click Split Surface to split out the selected area into a separate surface. Now the surface appears in the list of parts.
- Brush selection:
- Hold down Alt+LMB to use the brush selection and “paint” your selection onto the model.
- Click Split Surface to split out the selected area into a separate surface. Now the surface appears in the list of parts.
- Surface selection:
- Click on the surface you want to split out in the preview. This will be highlighted in green. Holding Ctrl/Cmd while picking surfaces will let you pick multiple.
- Click Split Surface to split out the selected area into a separate surface. Now the surface appears in the list of parts.
- Select the part in the list and click the name again, to rename the surface.
- Part selection:
- Select the part to split (will be shown with an orange outline in the preview)
- Click Split all – depending on the splitting method, a number of new surfaces will now appear in the list.
- Marquee selection:
- If you have split something that should not be split, but otherwise are happy with the surfaces you have created, you can merge the relevant surfaces again.
- select the relevant surfaces in the list, Holding Shift while selecting will select multiple.
- click Merge
Tool UI
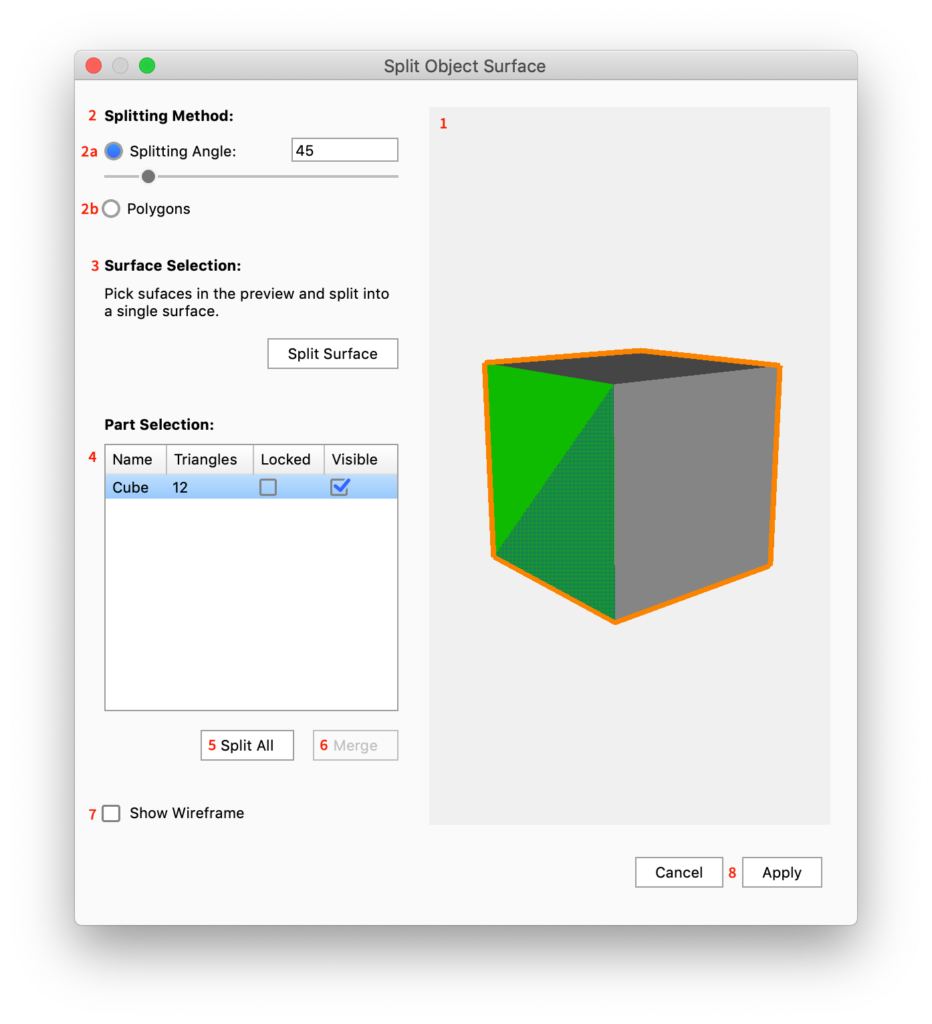
- Preview The preview shows the object you have selected to split. Surfaces highlighted in green can be split into a single surface using the Split Surface button. Objects marked in an orange outline can be split into multiple surfaces (depending on splitting method) using the Split All button.
- Splitting Method This determines how the surface(s) will be split out.
- Splitting Angle: Determine where you would like to split the part based on the angle adjacent polygons. Any polygon that has a face at an angle that is less than the value entered will be highlighted. This is useful when the split is a clear crease or angle in the part.
- Polygons: Use this to select individual polygons from the surface.
- Marquee Selection: Use this to drag a selection frame over the area you want to select.
- Brush Selection: With the brush selection you can paint your selection onto the model.
- Surface selection This lets you select and split out single surfaces. Click in the preview to select the surface (Hold control to select multiple)
- Split Surface Split the selected (green) area into a separate surface.
- Split Surface Split the selected (green) area into a separate surface.
- Part Selection This enables you to split out all surfaces of a selected part, based on the splitting method.
- Parts List: Lists all the parts
- Split All: Select a part in the list and press Split All.
- Merge: If you would like to merge certain split parts back, hold shift and select the parts you would like to merge and click Merge Selection.
- Show Wireframe Enable this to show the wireframe of the part.
- Cancel/ Apply To finalize the split, click Apply to create the new parts in the scene tree. Cancel will abort the process and the part will be as it was when the tool was launched.