Good UV’s are essential when you need to position labels on complex surfaces, use materials such as RealCloth or control the seams and direction of a texture on your object. If your geometry does not have useful UV’s the ![]() Unwrap UV tool enables you to generate UV coordinates for your objects.
Unwrap UV tool enables you to generate UV coordinates for your objects.
By selecting seams, charts, and directions you can control how the UV coordinates are created. When you have a set of charts you are happy with press unwrap – and then you can set the angle and scale of each chart to make them match each other.

About UV mapping
UV mapping is method of projecting a 2D texture onto a 3D object. It uses a set of U and V coordinates to map the texture to specific points on the surface.
KeyShot Studio operates with the following terms:
- Charts: A chart includes a separate set of UV coordinates for a section of the surface. An unwrapped object can have one or more charts.
- Seams: A seam is an incision in a chart or the edge around a chart.
- Direction guides: The direction guides represent the U direction of a chart.
Tool UI
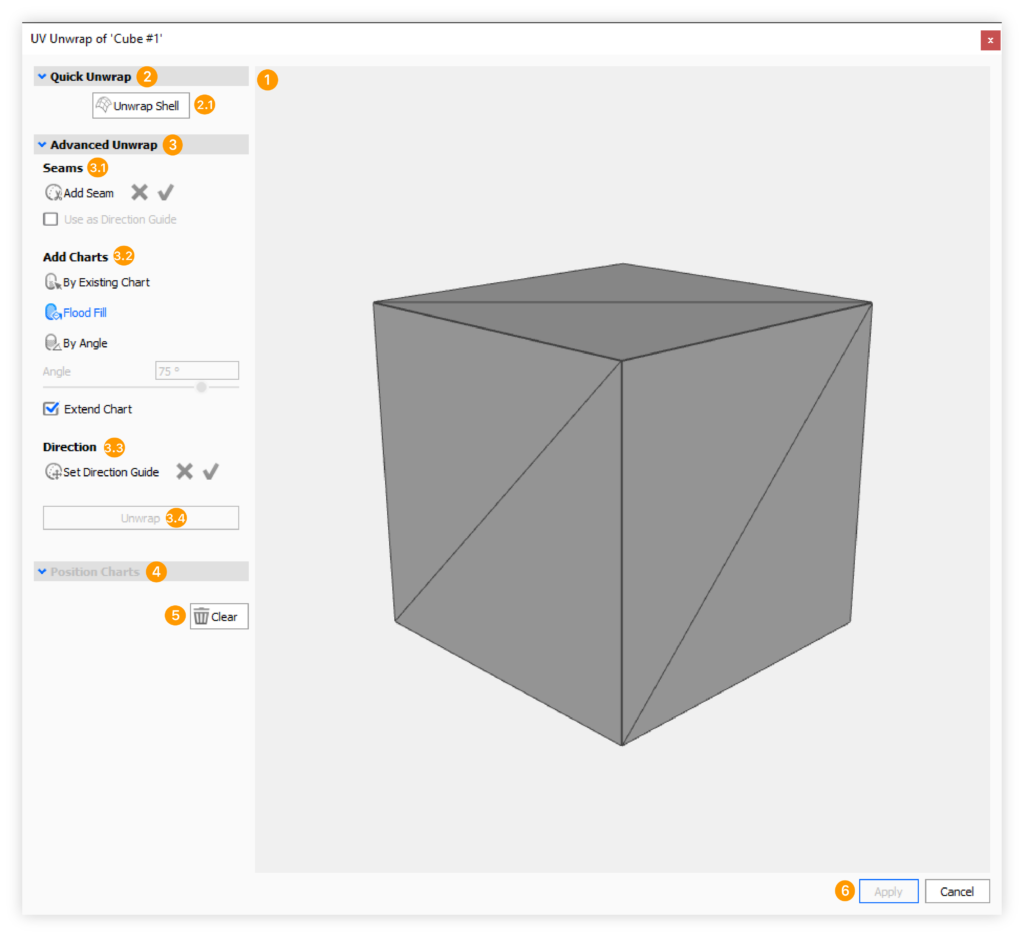
1 Preview: Shows the object that you are going to unwrap. The wireframe shows the geometry’s mesh. The faces of the mesh also act as the base for seams and directions when you are setting up the charts for unwrapping.
2. Quick Unwrap:
2.1
![]() Unwrap Shell: This method can unwrap shells in one click. It is targeted at simple shells, which can contain holes – but will not be able to unwrap sphere geometry (ie. closed objects). For those you will have to use the Advanced Unwrap, where you can specify multiple charts and control where to add seams.
Unwrap Shell: This method can unwrap shells in one click. It is targeted at simple shells, which can contain holes – but will not be able to unwrap sphere geometry (ie. closed objects). For those you will have to use the Advanced Unwrap, where you can specify multiple charts and control where to add seams.
3. Advanced Unwrap: The Advanced Unwrap enables you to create multiple charts, select where you want seams, and also control the U-direction of the UV-coordinates.
3.1 Seams If the geometry is a sphere (closed geometry) or in some instances a cylinder (a surface with holes) UV unwrapping will require you to set one or more seams. This is where Add Seam comes into play.![]() Add Seam: This enables you to, in the preview, select where you want to have a seam. The seam will be highlighted in red. Enable Use as Direction Guide if you want the U direction of the UV-coordinates to follow the seam. When this is enabled, this type of seam will be highlighted in orange.
Add Seam: This enables you to, in the preview, select where you want to have a seam. The seam will be highlighted in red. Enable Use as Direction Guide if you want the U direction of the UV-coordinates to follow the seam. When this is enabled, this type of seam will be highlighted in orange.
Use the ![]()
![]() buttons to cancel or apply the seam.
buttons to cancel or apply the seam.
3.2 Charts
A chart includes a separate set of UV coordinates for a section of the surface. There are 3 methods for creating charts. The blue color shows what method is active
![]() By Existing Charts: This method lets you re-select charts from the existing set of UV coordinates. If the object does not come with UV coordinates, this option will be disabled.
By Existing Charts: This method lets you re-select charts from the existing set of UV coordinates. If the object does not come with UV coordinates, this option will be disabled.
![]() Flood Fill: This method will grow the chart until it meets another chart or a seam.
Flood Fill: This method will grow the chart until it meets another chart or a seam.
![]() By Angle: The extent of charts added with this method depends on the angle between triangles in the mesh. The chart will stop when the angle between 2 adjacent triangles is larger than the angle set by the Angle slider.
By Angle: The extent of charts added with this method depends on the angle between triangles in the mesh. The chart will stop when the angle between 2 adjacent triangles is larger than the angle set by the Angle slider.
Extend Chart: Enable this if you want to add to a chart. When enabled you have to click in a triangle that shares a face with the chart you want to add to – then the next chart will be added to that chart. How much is added depends on the active pick mode.
3.3 Direction
![]() Add Direction Guide : This enables you to set the U direction for the UV coordinates. Note that the guides should not cross each other. The direction will be highlighted in green. You can add a direction guide both before and after adding the charts.
Add Direction Guide : This enables you to set the U direction for the UV coordinates. Note that the guides should not cross each other. The direction will be highlighted in green. You can add a direction guide both before and after adding the charts.
Use the ![]()
![]() buttons to cancel or apply the direction.
buttons to cancel or apply the direction.
3.4 Unwrap When you are happy with your charts’ seams and directions you can UV unwrap the object.
4. Position Charts Once you have unwrapped the object, the charts will be shown with a texture displaying how the UV’s flow.
Base UV Size: This slider lets you adjust the scale of all the charts.
Scale: If the charts do not match in size you can click a chart in the preview and adjust the scale of that.
Rotate: If you want to change the alignment of a chart you can select it in the preview and adjust this slider to rotate the UV’s of it.
Note
When you scale/rotate one chart, you may experience shifting of the UV coordinates on other charts – This occurs as a precaution to ensure that charts do not overlap in UV space
Use Material Texture on UV Charts. Enabling this will let you see the current material texture of the part in the preview, before applying the new UV’s to the part. This is only available if there is a texture assigned to the material.
5. Clear At any point in the process you can press Clear. This will reset to the state of the object when the tool was launched.
6.Cancel/Apply: Cancel will close the tool without applying new UV’s. Apply will close the tool while applying new UV’s (if you have unwrapped). This cannot be undone.
How to Unwrap UV’s
The Unwrap UV tool can be launched either from the Tools Section in the Ribbon, or via right-click on a part in the scene tree or Real-time view. If nothing has been selected when you launch the tool, a selection dialog will appear. Here you can select the part you want to unwrap in the list, or by clicking in the Real-time View, which will highlight the part in the list. Depending on the type of object you want to unwrap, you have 2 approaches:
Quick Unwrap
Unwrap Shell: If your object is a simple shell (an object with open edges) you can use the Quick Unwrap, Unwrap Shell. This will unwrap your object in one click. The method will not work for sphere geometry (closed meshes) and for cylinders, you will get the best result using the Advanced Unwrap.
Advanced Unwrap
The Advanced Unwrap enables you to create multiple charts, select where you want seams, and also control the U-direction of the UV-coordinates
- Add a Seam: Click on the
 Add Seam button. Then click on the surface (in the preview) where you want the seam to start. Click again to add more knots, and thereby draw the seam (red line). When you have added more than one knot, the preview suggests a path for you (dotted line). A single click on that will extend the seam to that point via the suggested path. If you don’t want to use the selected path, simply click at another point on the surface. The seam will then be extended to that selected point and a new suggested path will be generated. Double click if you want to commit to the entire suggested path.
While you are drawing the seam you can select if it should also determine the U direction of the UV coordinates (the seam will turn orange when this is selected).
When you are happy with your seam click the green check mark to apply it. Repeat if you want additional seams in the UV map. The seams should not cross each other. You can close the seam to make sure that the surface is split into 2 charts. But you can also create seams by adding charts using the By Existing Chart or By Angle methods.
 - Add Chart: Depending on the complexity of your object, you may need one or more charts to cover your geometry when you unwrap. If your object already has a set of UV coordinates, which are close to what you want, you may want to use the
 By Existing Charts method. If you just want one chart or to fill the remaining surface between charts/seams, you can use the
  Flood Fill. If you want more control over what is added, you can use the
  By Angle method. Set the angle to limit how much you want the chart to include and click on the surface to add a chart. The chart will grow until it meets an angle between triangles that is larger than the angle set with the slider.
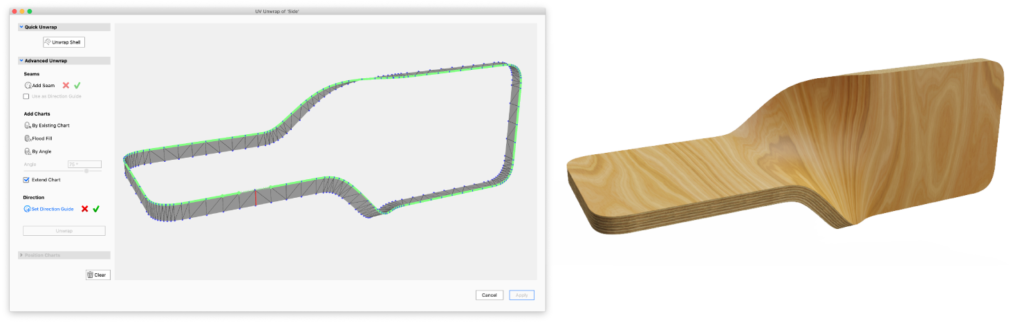
You can combine the methods by enabling the Extend Chart checkbox. When enabled, you can add to an existing chart by clicking in a triangle that shares an edge with the chart. This way you can e.g. combine 2 existing charts or you can use By Angle to create the outline of a chart and then use Flood Fill to fill it up. - Add Direction Guide: If you want to control the direction of the UV’s you can add one or more direction guides. the direction guide enables you to select a line in the geometry that the U direction will follow. The example below shows how the use of a direction guide allows the texture to follow the twisted edge of the plywood.
- Unwrap: When you have specified all the charts/seams/directions you think are necessary, press Unwrap. If the whole surface is not covered, KeyShot Studio can automatically generate charts for the remaining triangles. Now, the charts will appear with a texture that shows you how the UV’s flow on each chart.
- Position Charts: When the charts are unwrapped you can adjust them so they match each other as much as possible.
If your part has UV mapped texture applied, the Use Material Texture On UV Charts option will enable you to see the part with the texture applied before finally applying the new UV’s to the object. - Apply: When you are happy with the result press Apply. The object will now have the new UV coordinates and you can apply your labels, textures etc.
If you are not entirely happy with the UV map, you can always undo, as long as you have not applied the new UV’s to the part yet. Otherwise the Clear button will reset the UV’s to the starting point, when the tool was launched,
Warning
- Applying the new UV’s will overwrite any existing UV coordinates on the part. This cannot be undone.
- If you use Live Linking or update your geometry on import, any changes made to a part’s UV coordinates will be overwritten.