Walkthrough Mode allows you to move around inside your scene and see it from a “first-person” point of view.
To enter Walkthrough Mode go to Project Window > Camera tab > Position and Orientation. Select Walkthrough Mode and the Walkthrough Mode HUD will appear and a camera called First Person will be added to the camera list.
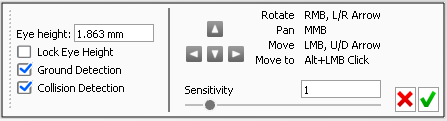
Eye height
The eye height indicates the height of the camera in relation to the lower object.
Lock Eye Height
Locking the eye height will keep the camera at a constant height and will ignore the ground detection setting covered below.
Ground Detection
Ground detection will automatically adjust the camera height in order to keep it at the set Eye Height specified above. If you move towards an object such as stairs, the camera will appear to be going up the stairs and will respect the “new ground”.
Collision Detection
Selecting this setting will keep you from moving through objects. This is used to make the walkthrough more realistic by not allowing you to move through objects that you should not be able to go through.
Arrows
Click and hold the arrows to “walk” around your scene in the arrow’s direction.
Sensitivity
Like its name describes it, this adjustment will control the sensitivity of the controls in order to move around the scene in Walkthrough mode. You can either move the slider around or type a value in the box.
Accept/Cancel
- Clicking the X at the bottom right cancels any changes and deletes the camera from the list.
- Clicking the V at the bottom right accepts any changes and saves the First Person camera.
Walkthrough Navigation
To navigate within the scene in Walkthrough Mode, you can:
- Use the arrows on your keyboard or the arrows in the widget.
- Hold the left mouse button and drag in the direction you would like to move.
- Hold the right mouse button and drag to rotate in place.
- Hold the middle mouse button to pan the camera.