Compositing Examples with Render Passes
Render Passes can be used in various ways during post-processing. Below are two basic examples of compositing workflows with Render Passes, using Photoshop to explain the concepts.
Note
Some discrepancies may exist between the rendered still image and a composite using Render Passes. Furthermore, Render Passes do not capture some of the more complex material effects like translucency (Translucent material).
Reconstruct Beauty Image from Passes
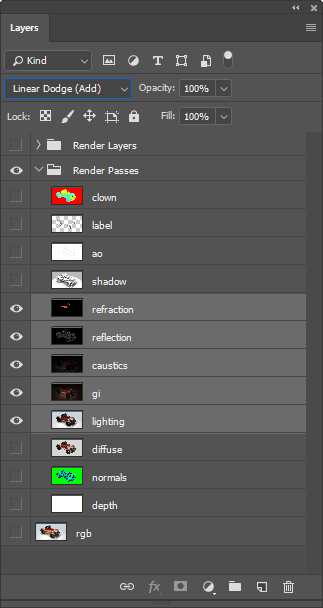
Passes can be used to reconstruct the rendered still image, commonly called the “beauty pass” in compositing workflows. Adding together the Lighting, Global Illumination, Caustics, Reflection and Refraction Passes allow to achieve the beauty image.
In Photoshop, adding is done by setting each pass layer’s blending mode to “Linear Dodge (Add)”.


Adjust Beauty Image with Passes
The same passes from the workflow above can also be used to strengthen or weaken their effect on the beauty image. In Photoshop, strengthening the effect of a pass is done by setting the pass layer’s blending mode to “Linear Dodge (Add)”. Weakening the effect is done by setting the blending mode to “Subtract”. In both cases, the beauty image should be the base layer, positioned below the passes.
The example below shows the effect of adding the Reflection pass to the beauty image.


The example below shows the effect of subtracting the Global Illumination pass from the beauty image.