Animation Timeline Interface
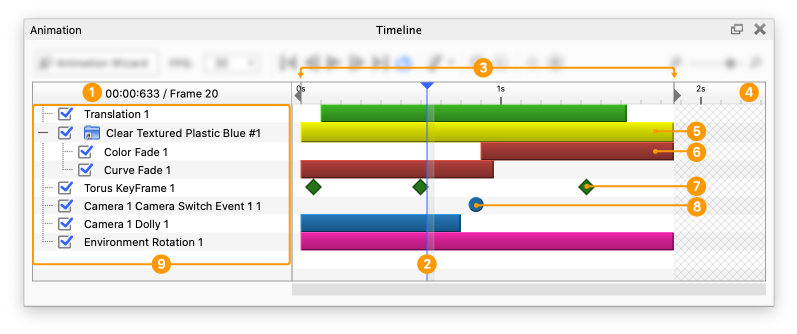
- Time Stamp
This will show where the preview line currently is on the timeline. - Current Time Indicator Line
This line is the marker for the where in the timeline the real-time render window is rendering from. When you play a real-time preview, this line will move with in time with the animation. Click and drag the line to scrub to a point in the animation you would like to preview.
The transparent area on the right side of the indicator shows the duration of a frame. - Start/End Markers (Work area)
Use this to designate the actual animation to be rendered. The space between these markers is called the Work Area. - Ruler
This shows the timeline in the units chosen (seconds or frames.) - Folder Nodes
Yellow Nodes are “Folder Nodes.” Changing the duration and location of a folder node affects all animation nodes contained within it. - Nodes
Each animation is represented in the timeline as a colored bar called a “Node.” Most nodes can be selected at the ends and dragged to change the duration of the animation. Click on the body of the node to move along the timeline. Hold SHIFT while dragging to snap to another node.- Green nodes – Part animations
- Blue nodes – Camera animations
- Red nodes – Material animations
- Pink nodes – Environment animations
- Keyframe animations
Each diamond marks a keyframe. - Switch events
Dots on the timeline marks switch events.- Blue dots – Camera Switch Events
- Purple dots – Studio Switch Events.
- Node List
This lists all animation nodes and folders. Use the check boxes to toggle the active state of the animation nodes.
Timeline Toolbar

- Animation Wizard
This opens the Animation Wizard. - FPS drop-down
Select from common frame rates used in video production. - Real-time Preview Buttons
These buttons will allow you to quickly jump to the beginning or end of your animation, scrub through the animation one frame at a time, and play a real-time preview of your animation in the real-time render window. To see a more accurate portrayal of materials and motion, click the “preview” button on the animation toolbar. -
 Loop
Loop
Enable this to loop the animation when playing in the real-time window. -
 Motion Blur
Enable this create motion blur in your rendered animation output.
-
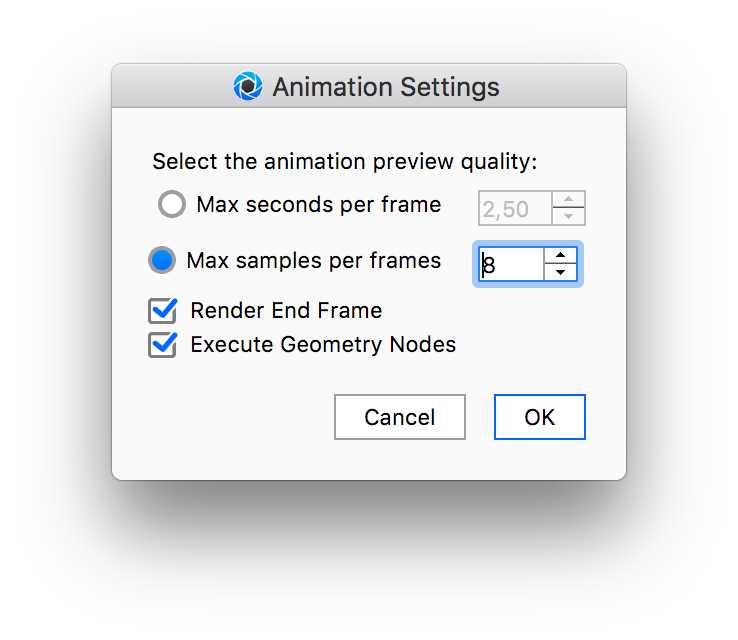
 Animation Settings
Click the settings icon to open the settings panel where you can select from Max seconds per frame to limit the render time of the preview, or choose Max samples per frames to limit the quality of the preview. You can also choose to in-/exclude the last frame and if Geometry nodes should be executed for the animation – see the Geometry Node Types page for more info. -
 Render Preview
Click this button to begin rendering a small video file of your animation with more accurate results than what you see in the Real-time view. -
 Add Keyframe
Click this button to add a Keyframe at the current time in the timeline. The button will be disabled until a keyframe animation is selected in the timeline. -
 Keyframe Record Mode
Enable this to enter Keyframe Record Mode, which offers a faster workflow for creating your keyframe animation. - Zoom Slider
Use this to change the scale of the Animation Timeline.
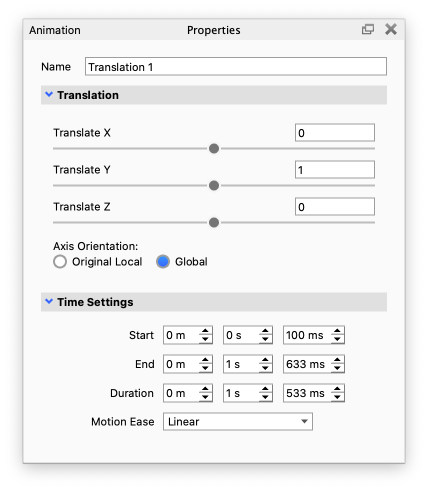
Animation Properties
When an animation node is selected in the timeline, the properties of that animation will be present in the Animation Properties panel.
See the Animation section for more info om working with animations.