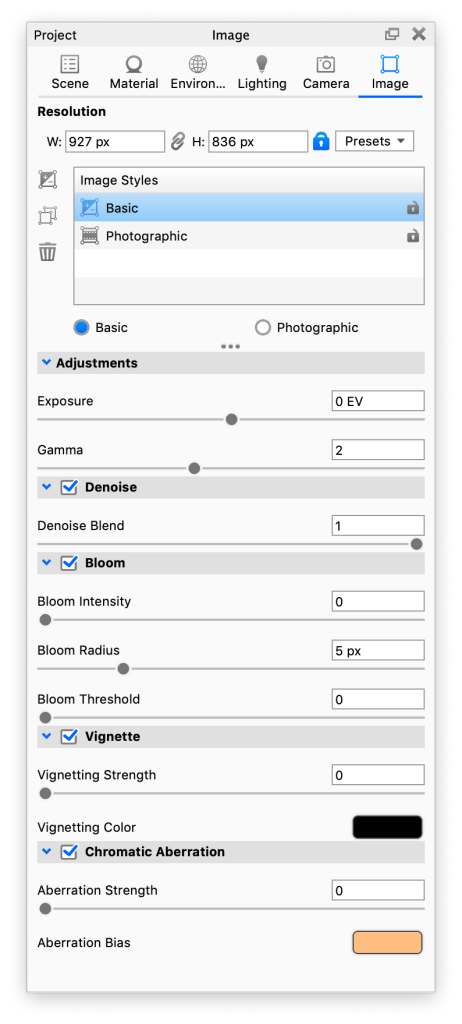
Adjustments
- Exposure – Determines how affected the scene is by the light. Increasing the EV (exposure value) by 1 will double the amount of light in the image.
- Gamma – Adjust the image’s intensity withgamma. Decreasing the gamma will make the image darker while increasing the gamma will lighten the image.
Denoise
Denoising will even out noise in the image, both in the Real-time View and in the final rendering. In the Real-time View, it will kick in after 1 second and be refreshed every 5 seconds (the interval can be adjusted in Preferences). You can always follow the Denoise state in the Heads Up Display. Denoising can also be toggled from the Ribbon, but the button will be disabled, if you have locked your image style.
- Denoise Blend – The Denoiser creates a denoised image which is blended with the rendered image. The Denoise Blend slider enables you to control the strength of the denoise effect. Decreasing the value will allow more of the original noise in the image.
If you have a scene with fine details or textures, the denoise may wipe out the details – try to decrease the Denoise Blend value. - Firefly Filter – The Firefly Filter may help to reduce pixels that stand out in the image. The slider enables you to control the strength of the filter. A high amount of filter may in some cases remove details in the image that are wanted. If this happens, try decreasing the value.
Note
KeyShot Studio 2024.3 an onward uses progressive denoising if you have a Nvidia RTX 20-series GPU or newer. This is independent of you being in CPU or GPU mode. Systems with older GPUs ( GTX 900- or 10-series) will default to the old denoise.
Sharpen
The Sharpen effect will make the edges of your image appear more sharp allowing you to make details stand out more.
-
Intensity - The darker edges will appear darker and the lighter edges will appear lighter, effectively making the image more "intense".
-
Radius - The area around the edges will be increased, making them appear wider and more noticeable.
Bloom
- Bloom Intensity – The brightness of the light fringing or glow.
- Bloom Radius – Determines how far the bloom glow extents in pixels.
- Bloom Threshold – The clipping of the bloom glow to bright pixels. A value of 0 means no clipping. Larger values focus the bloom on the brightest pixels.
Warning
The Bloom radius is defined in pixels and this value is not relative to the resolution. This means that the bloom radius will not scale in the Render Output has a larger resolution than the Real-Time View.
Vignette
- Vignette Strength – Determines how strong the vignette is, the higher the value the more solid the vignetting color will seem in the corners.
- Vignetting Color – Choose the color that the vignette fades into, defaults to black. Click in the color-field to trigger the color selector.
Chromatic Aberration
Chromatic Aberration occurs in real life when the camera lens is unable focus all colors to the same point. This results in colored fringing along the edges of the object. With Image styles you get an approximation of the effect.
- Aberration Strength – Determines how strong the effect is.
- Aberration Bias – Controls the color of the distortion.
Known Issue
Using Chromatic Aberration on a model that exceeds the image size may cause artefacts near the edges.

Legacy image styles
If you open a KeyShot Studio 7 scene with Image Adjustments/Effects they will be added as a Basic Image Style