Real-time View
The KeyShot Studio Real-time View is the main viewport in the KeyShot Studio user interface. All real-time rendering of your 3D model will occur here. You can navigate your scene using the camera controls, multi-select objects and right-click directly on your model or in the area around it to view more options.
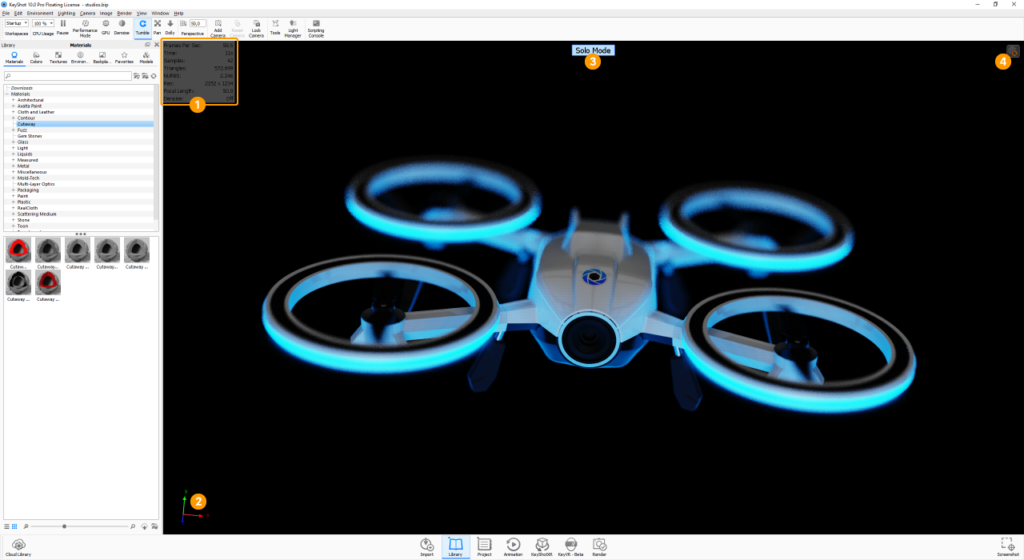
1. Heads Up Display
For information concerning the Real-time View you can turn on the Heads-Up Display via the Main Menu under View > Heads-Up Display.
The Heads-Up Display will be located in the top left corner of the Real-time View. It shows
- FPS: frames per second – shows the rendering speed in CPU mode
- Samples per Second: shows the rendering speed in GPU mode
- Time: how long the Real-time View has been rendering
- Samples: Number of samples the Real-time View has been rendering.
- Triangles: the amount of triangles present in the scene, excluding hidden Parts/Model Sets.
- NURBS: the amount of NURBS present in the scene, excluding hidden Parts/Model Sets.
- Res: the Real-time View resolution.
- Focal length: The current Focal length of of the camera.
- Denoise: shows the current state of the Denoiser.
- GPU Memory: shows the GPU memory usage in relation to the total memory. If the GPU runs out of memory, KeyShot Studio will revert to CPU mode.
2. Coordinate Legend
To help orientate in the Real-time View you can turn on the Coordinate Legend. This will show the X,Y and Z axis of the current view. Turn on the Coordinate Legend via the Main Menu under View > Coordinate Legend.
3. Solo mode indicator
This indicator will appear whenever you are in Solo mode.
4. In-view Indicators
Under some circumstances in-view indicators will be displayed in the top right corner of the Real-time View.
![]() The Render Nurbs indicator will be displayed when Render Nurbs is active and the button is hidden.
The Render Nurbs indicator will be displayed when Render Nurbs is active and the button is hidden.
![]() The Performance Mode indicator will be displayed when Performance mode is active and the button is hidden.
The Performance Mode indicator will be displayed when Performance mode is active and the button is hidden.
![]() The Lock indicator will be displayed when the camera is locked and the button is hidden.
The Lock indicator will be displayed when the camera is locked and the button is hidden.
![]() The GPU indicator will be present when in GPU mode and the GPU button is hidden.
The GPU indicator will be present when in GPU mode and the GPU button is hidden.
![]() The Denoise indicator will be present when Denoise is active and the Ribbon button is hidden.
The Denoise indicator will be present when Denoise is active and the Ribbon button is hidden.
![]() The Generate Environment indicator (pro) will be displayed when you have made changes in the HDRI editor and these are not yet generated in the full resolution. You can click the indicator to generate the environment in full resolution.
The Generate Environment indicator (pro) will be displayed when you have made changes in the HDRI editor and these are not yet generated in the full resolution. You can click the indicator to generate the environment in full resolution.
![]() The Execute Geometry Nodes indicator will be displayed when the scene contains geometry with Geometry Nodes (displacement/bubbles/flakes) or RealCloth which have not been executed. Click the indicator to execute all geometry nodes in the scene.
The Execute Geometry Nodes indicator will be displayed when the scene contains geometry with Geometry Nodes (displacement/bubbles/flakes) or RealCloth which have not been executed. Click the indicator to execute all geometry nodes in the scene.
![]() The Warning icon will be shown if your scene contains something that is not being shown correctly in GPU mode – e.g. Cutaway materials.
The Warning icon will be shown if your scene contains something that is not being shown correctly in GPU mode – e.g. Cutaway materials.
Resolution
The Real-time View will respect the resolution/aspect ratio set in the Image Tab.
Docking Windows
Windows with resources and editing options (see which here) can be docked inside the Real-time View. You can dock windows on the sides and in the bottom of the view – and in multiple columns/rows if desired. To dock a window drag it by the title-bar towards the middle of the edge you want to dock it to. When a grey docking area is expanded, simply drop the window there. To un-dock, drag the window by the title bar, away from the dock area. If the Real-time View has a locked image size, the docked windows will respect the size, limiting how much they can be resized and where they can be docked.