The animation panel consists of 2 elements – the Timeline and the Animation Properties. This can be toggled via the ![]() animation option in the Toolbar or via the hotkey A.
animation option in the Toolbar or via the hotkey A.
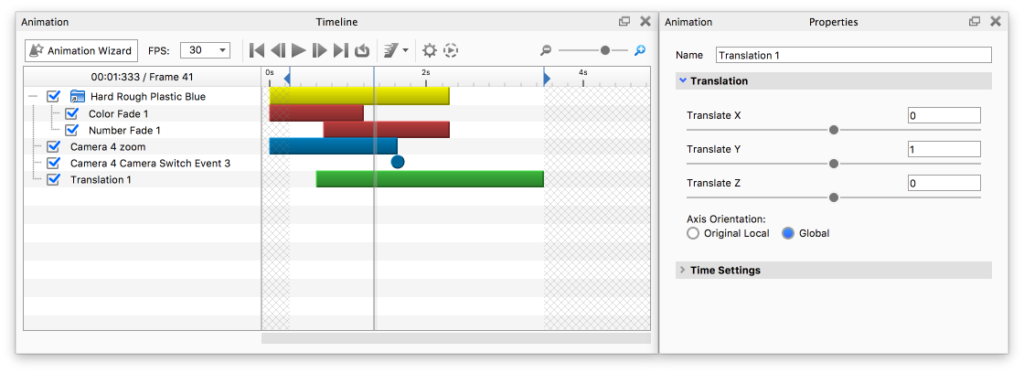
Animations are represented with nodes in the timeline and labeled according to the name set in the animation properties. When an animation node is clicked in the timeline, the properties will be displayed.
Animations can be shifted in time and scaled interactively to control timing and duration.
Timeline
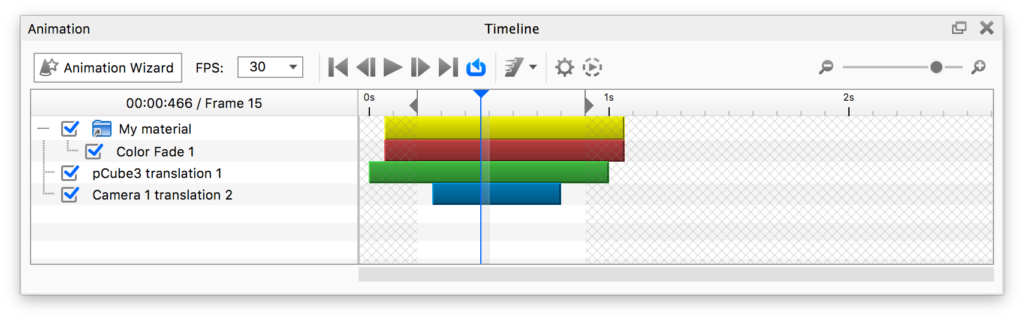
The Timeline shows all the animations that relate to the current state of the Real-time view. If an animated part/camera etc. is hidden the animation node will not be visible in the Timeline.
Groups of animations can be consolidated in a single folder for organization. These folders can also be scaled and shifted to control timing and duration.
Time indicator
You can grab and drag the Current time indicator back/forward to the place in the animation you wish to see.
Work Area
The Work Area limits the time span of your animation. With the 2 left/right facing triangle-handles you can limit the Work Area. The Start/End time of the Work Area can also be set by right-clicking in the timeline ruler or in the Render Dialog before you render your animation.
Managing Animation nodes
Animation management utilities can be found by right-clicking on animation nodes in the animation list. To change the animation order or to move an animation into an existing folder, click and drag the animation. To multi-select animations, hold CTRL (PC) or Command (Mac) while selecting multiple nodes.
Add Folder
Right-click on a blank area in the animation list to display this option.
Duplicate
To duplicate an animation or animations, right-click on the animation(s) you would like to copy and select Duplicate.
Mirror
Right-click on the animation(s) you would like to have a reverse duplicate animation of. This is useful for exploded view animations and for situations where you need to have the animation end where it began, such as for a looping video.
Lock/unlock
This will lock/unlock the current animation node, this means that the animation is still visible but can not be edited. Locked nodes appear with a color a shade lighter that the unlocked nodes.
Hide/show
Deactivates/activates the current node. This is the same as toggling the checkbox in front of the node name.
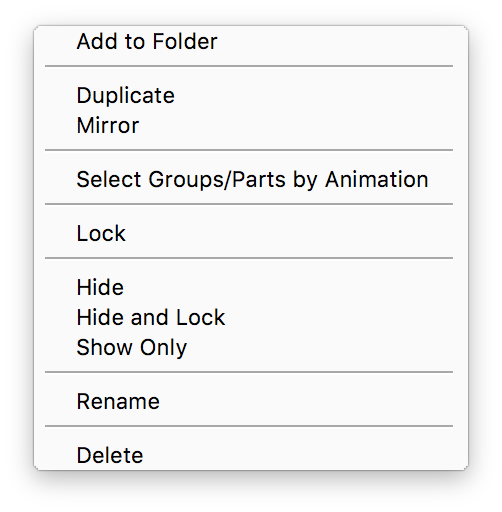
Hide and lock
Deactivates and locks the current node
Show only
Deactivates all other camera or part animations.
Rename
This will let you rename the current node, without going through the properties.
Sort By
This will let you sort your animation list by; Name, Type or Start Time. If you change the order by drag and drop, the sorting will revert to None.
Delete
Select this option to delete one or more animations from the timeline
Animation Properties
Selecting an animation will display its properties on the right side of the Animation panel. These settings are the same used when creating an animation via the Animation Wizard. You may change all existing animation settings as well as the name of the animation in the animation properties. See the Animation Types for detailed descriptions
If the Animation window is docked, or if your un-docked animation properties panel is not very tall, you can collapse sections of the properties to see the parameters that are most useful to you at that time.
Linked Animations
Linked animations are animations that are identical across Parts/Group/Model Sets. When you edit one it will impact all. If an animation is linked the animation icon in the Scene Tree will have a little blue + like so ![]() .
.
Link Animations
If you duplicate a part/group with an animation it will by default be linked. If you want to use the same animation on different parts you can copy the animation itself, and then paste it as linked on the other part/group. Animations can also be linked across Model Sets. When you create a new Model Set you can select if animations on the geometry you choose to clone shall be linked or not.
Unlink animations
To unlink an animation you only have to right click the animation in the Scene Tree and select Unlink Animation.
Pivot Points on linked animations
By default the pivot point of a rotation will be set to Self which means that rotation will be centered at the part itself. In the context of linked animations this can be useful if you e.g. have a number of screws that you want to remove from a casing synchronously. If however you want to rotate multiple parts around a the same center you will have to choose a specific part to be the pivot point for the linked animation.
Keyframe Animations
Keyframe animations are defined by Keyframe points that record an objects position, rotation and scale, at a specific point in time. Once your Keyframe Animation has been created, you can continue by creating additional keyframe points.
Creating Keyframe points
To insert a Keyframe point at the current point in time, click ![]() in the Animation Timeline. This will record the objects current position values. Clicking the button will also automatically open the move tool on the new Keyframe, allowing you to edit the position, should you need to.
in the Animation Timeline. This will record the objects current position values. Clicking the button will also automatically open the move tool on the new Keyframe, allowing you to edit the position, should you need to.
Editting Keyframe points
To edit a Keyframe point that has already been inserted, you can click the keyframe in the timeline. This will bring up the move tool on the object, and moving it will automatically record the position for both the object and the recorded keyframe.
Keyframe Record mode
Record mode is an alternative to the above workflow. Pressing ![]() will enter Record mode. While in this mode, moving any object with a keyframe animation attached to it, will automatically create and edit keyframes. This allows for a faster workflow when you have multiple keyframes, or are creating an advanced animation.
will enter Record mode. While in this mode, moving any object with a keyframe animation attached to it, will automatically create and edit keyframes. This allows for a faster workflow when you have multiple keyframes, or are creating an advanced animation.
Combining Keyframe animations
If you need to combine multiple Keyframe animations or combine it with other animation types, you have to keep the animations at separate object levels. If you have two animations on the same hierarchy level in the scene tree, it will only use the first one for the animation.
Note
It is not possible to combine Keyframe animations with other animation types, on the same object hierarchy level.
Animation Settings
Clicking the ![]() will bring up the Animation settings dialog.
will bring up the Animation settings dialog.
Animation Preview Quality
The first option in the dialog, is controlling the amount of samples rendered for each frame in the Animation Preview.
You can choose to set either a max time per frame, or a specific amount of samples per frame.
Render End Frame
With this setting you can control whether the final frame of the animation should be included in the rendering.
Execute Geometry Nodes
Geometry nodes can be slow to execute, this setting allows you to disable executing geometry nodes with each frame, when playing the animation in the realtime view.
Respect Scene Tree animation ordering
If you perform multiple animations on a part/group any translations will by default be executed last, as this will move the pivot point. With this setting you can force the animation to respect the order set in the Scene Tree (top to bottom).