The KeyShotXR output option is available if the KeyShotWeb Add-on is installed. It provides setup and output of a KeyShotXR as well as options for render layers and render passes.
Learn more about KeyShot XR.
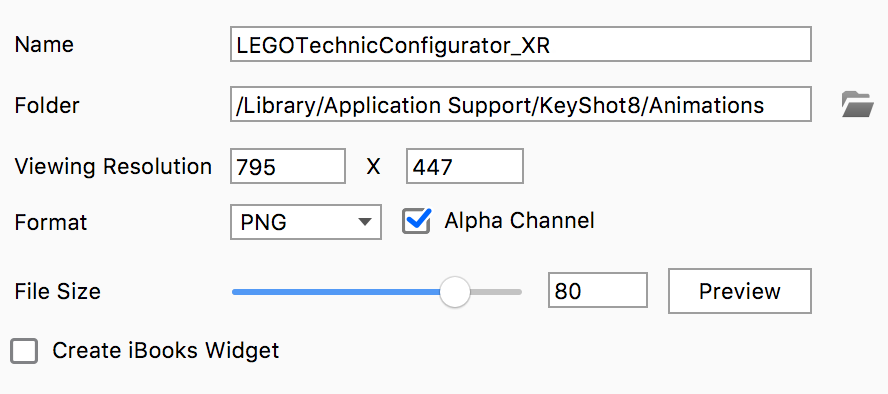
Most of the parameters set in the KeyShotXR Wizard can be edited in the KeyShotXR Render Output options. Additionally, there are other options for file format, file size, and iBooks output for viewing on iOS devices. There are also Advanced options for KeyShotXR control, customization and direct upload to a website via FTP.
Output Options
Name
Select the Prefix and Name Template that fits your needs. If the Template includes either the System or Scene Revision # you can reset them here. The Filename shows the full render name generated from the Prefix and the active Name Template. Learn More about Name Templates.
Folder
Set a destination folder the XR files. In this location the .html file will be added along side with a new folder containing all image files etc.
Viewing Resolution
Set the resolution

Format
Choose JPEG or PNG for the frames. Check Alpha if you want transparency on .png images.
File Size
Selecting the “Preview” button will render one frame from the KeyShotXR and has a compression slider that allows adjustments to the quality of the image, and updates in real-time. Be aware that a larger file size could increase the time to load the KeyShotXR in the browser.
KeyShotXR Control
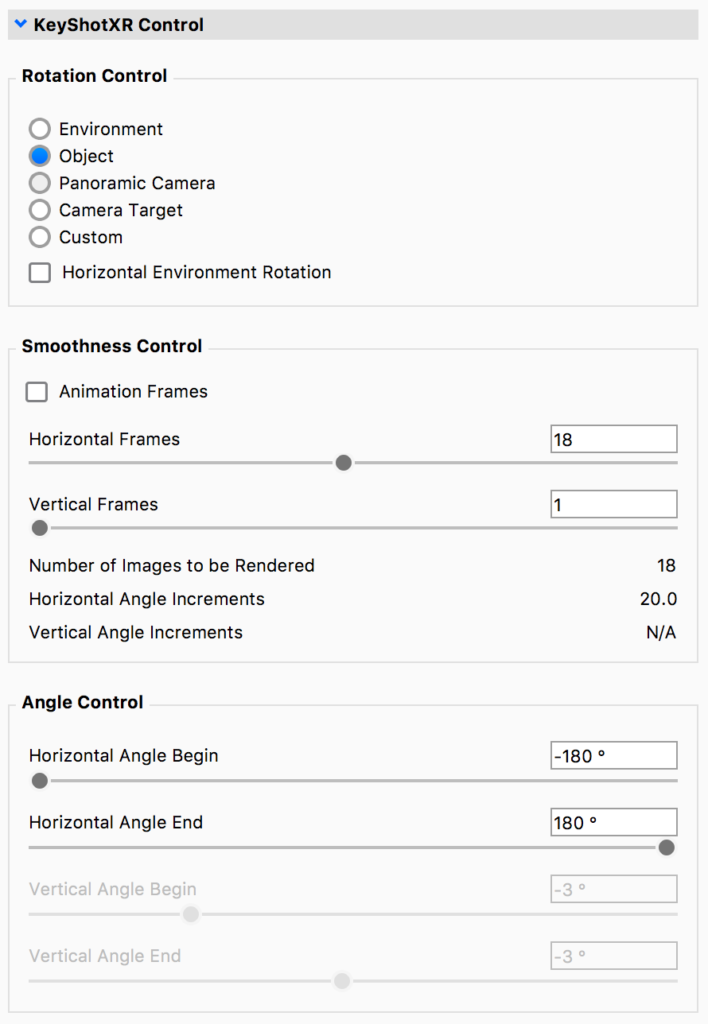
Rotation Control
Environment
This option will set the center of rotation at the center of the scene.
Object
Select an object in the scene as a center of rotation.
Camera
Use the current camera settings to use as your rotation center.
Look At
Use your current “Look At” as your rotation center.
Custom
This option allows you to select the center of rotation from your scene tree items.
Horizontal Environment Rotation
Enable this option to have the environment rotate with the KeyShotXR.
Smoothness Control
Animation Frames
If animation is applied to the scene, you will be able to create a KeyShotXR from this animation. Additional parameters will be shown if enabled. See previous page for animation frames settings.
Horizontal Frames
This controls the number of frames in the “X” direction. The higher the number of frames, the more smoothly your model will rotate.
Vertical Frames
This controls the number of frames in the “Y” direction. The higher the number of frames the more smoothly your model will rotate.
Number of Images to be Rendered
This shows the number of images to render based on the number of horizontal and vertical frames.
Horizontal/Vertical Angle Increments
This shows the degrees between each frame. This value will change depending on the number of vertical and horizontal frames and the starting and ending angles.

Angle Control
This is equal to the custom setting of the KeyShotXR Mode in the wizard and controls possible viewing angles of KeyShotXR. If you want to use presets such as Turntable, Spherical, Hemispherical or Tumble use the wizard.
Horizontal
This controls the beginning and end of the rotation on the “X” plane.
Vertical
This controls the beginning and end of the rotation on the “Y” plane.
Advanced
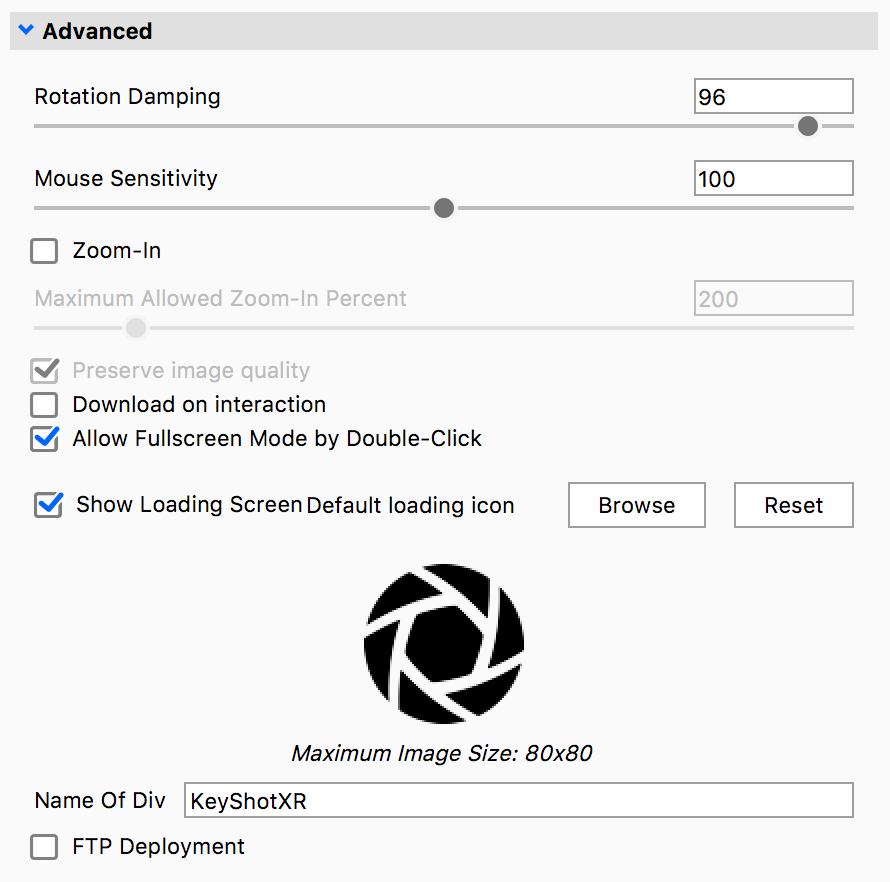
Advanced settings for KeyShotXR are located in a drop-down menu on the same window as the custom settings. This menu controls how your KeyShotXR interacts in the web browser.
Rotation Damping
Increasing this value will reduce the time it takes a model to come to a rest after rotating it.
Mouse Sensitivity
This controls the overall mouse sensitivity in the KeyShotXR . Increasing this value will increase the model movement with less mouse movement.
Zoom-In
Enabling zoom-in will allow you to zoom into the KeyShotXR when inside the browser. Use the “Maximum Allowed Zoom-In Percent” slider to control the amount the user can zoom in your KeyShotXR.
Note: To ensure the browser page will scroll when the mouse scroll wheel is used while over the KeyShotXR, this option will need to be disabled.
Preserve Image Quality
Enable this option to render the frames at larger resolution for optimal image quality when zooming in. The image quality will be preserved when zooming in by enlarging the rendered frame resolution accordingly. This is separate from the viewport resolution setting for each frame. This will also increase the KeyShotXR file size.
Download on interaction
Enabling this option will set the KeyShotXR to only load the images into the browser after the user interacts with the KeyShotXR .

Allow Fullscreen Mode By Double-Click
Double-clicking the left mouse button will enter full-screen mode.
Show Loading Icon
Enabling this will allow the loading icon to be shown when the KeyShotXR is loading in the browser. This image can be changed by selecting “Browse” and browsing to the image file you prefer.
Name of Div
This defines the KeyShotXR section in the HTML code.
FTP Deployment
Enable this option to allow KeyShot Studio to load the rendered KeyShotXR directly into your FTP address.
Confirm Before Deployment
When the KeyShotXR is finished rendering, you will be prompted to accept the deployment to the FTP site.
Generate Embeddable HTML Code
This will give you the code necessary for implementing your KeyShotXR in a website using the iframe tag.
Embed FTP Settings in BIP File
This will save all the FTP credentials inside your KeyShot BIP file for easy deployment by another user.
Layers and Passes
See Layers and Passes section.