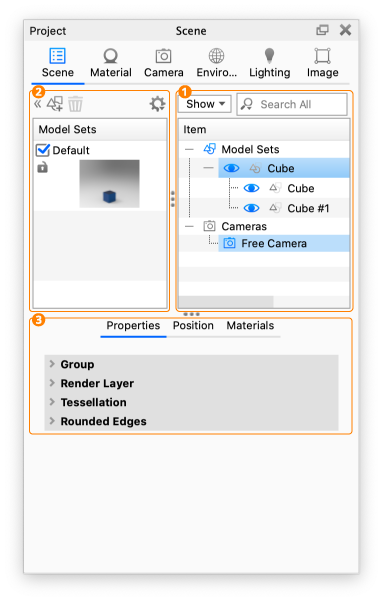
The Scene tab contains all the items in your scene:
1. Scene tree
The Scene tree contains the hierarchy of elements in your scene in the following order:
-
 Model Sets
 Models are the top level group, which can contain multiple groups
 Groups
  Parts
Parts
-
 Cameras
 -
 Environments
Animations (Pro only) can show up in every step of your hierarchy depending on the element the animation was applied to.
You can use the Search function and Show drop-down to filter what is shown in the Scene Tree.
See Working With Models > Scene Tree for more details.
2. Model Sets (Pro only)
With Model Sets you can have several independent Scene Tree variations within your file, making it easier to handle product variations.
![]()
![]() Hide/show the Model Set list
Hide/show the Model Set list
![]() Add Model Set: this will launch a dialog where you can name and select to include parts of other (active) Model Sets in the new Model Set
Add Model Set: this will launch a dialog where you can name and select to include parts of other (active) Model Sets in the new Model Set
![]() The Model Set Settings enable you to toggle visibility/set the size of Model Set thumbnails, Set the Thumbnails Render Settings and re-render the thumbnail for the selected Model Set
The Model Set Settings enable you to toggle visibility/set the size of Model Set thumbnails, Set the Thumbnails Render Settings and re-render the thumbnail for the selected Model Set
Double Click to isolate a Model Set.
See Working With Models > Model Sets for more detail.

3. Information and settings
This section has one or more tabs with information that is related to what is currently selected in the Scene Tree. In addition to that, the Material info tab will always be present, It gives an overview of all the materials used in the scene, much like the In-Project library which can be found in the Material Tab
Scene Information
Shown when nothing, the camera list, environment list or an animation is selected.
This tab gives you an overview of general information related to the scene, such as which type of Units the scene uses as well as info about the content of the scene, number of parts, triangles, model sets etc. You can also give your scene a name. This name will be used
- when saving the scene
- for the Name Template variable, Scene Name.
Model Set
Shown when a Model Set is selected.
This tab gives you the ability to:
- (re-)name your Model Set,
- toggle the Always Visible state
- lock/unlock the Model Set
- render a thumbnail for the Model Set
See Working With Models > Model Sets for more detail.
Properties
When a Group, Part, Camera or enviromnet is selected you can see the Properties tab, which depending on the selection, will give you the following options.
- Group: If your selection is a group this enables you to rename and lock/unlock the group. You can also find information about the size of the group and how many triangles it contains. Furthermore you can Unlink any linked materials in the group.
- Part: Here you can rename and lock/unlock the part. You can also find information about the size, number of triangles and assigned material. Furthermore you can Select to Edit the current material or Unlink it, which will create a new instance of the material (if it was linked).
- Camera: Here you can change the name of your camera, make it the active camera and access the settings for the selected camera.
- Environment: Here you can change the name of the environment, access the environment settings or delete the environment.
- Render Layer: The Render Layers enable you to create a pass for specific parts/groups. Simply select the parts you want a mask for, press
 Add Layer and give the render layer a name. Go to Layers and Passes for more information.
 - Tessellation: if the part/group contains NURBS information, you can select to Re-tessellate or set it to always render as NURBS. Go to the Re-Tessellate tool to learn more.
- Rounded Edges: Allows you to simulate fillets on parts. Go to the Rounded Edges page for more information.
Position
The position tab is present if a part, group Here you can set the size/position of the selected Model, Group or Part.
Also see Working With Models > Moving Models and Parts.